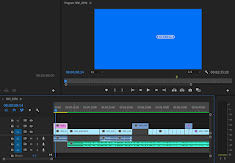
Here is the 'offline' edit of my music video. This shows all of the clips I will use in my video in the order they will be in and for how long they will last. No editing to the visuals or audio has been done as this is just to give you an idea of the clips that will be used and when they will be used. The final edit will look completely different but now when it comes to doing that final edit I won't have to lay out all the clips. The only tools I used in Premiere Pro for this edit where the cut and drag tools as well as a bit of speeding up for the timelapsed clips - and that's it. (No effects, sound design, graphics etc.) 2 Hours

This is the timeline for the offline edit. As you can see it is quite basic, with a single green audio track at the bottom (song.) Where I have stacked clips (blue) it means only the top clip is visible. This was when I decided to replace a clip but instead of removing the clip I was replacing I instead left it underneath in-case I decide to go back to using it. Final edit is at the bottom of this post (this will be my longest post ever)
Editing Process
OVERALL ADJUSTMENT LAYER: 3 Mins
To create the more nostalgic look I created an adjustment layer which overlays the whole project. To this adjustment layer I cropped the left and right sides by 14% which means the whole project is cropped by this much which creates the older camera feel (aspect ratio 4:3.) In addition I slightly added the faded film effect to this adjustment layer to emphasise the nostalgic feel. I was also going to posterise/reduce the frame rate to 18fps for the whole project to really resemble an old camera however it made the video more annoying to watch so I left it at 30fps. 


SHOT 1 - 47 mins
1.Firstly I downloaded the highest resolution image I could find of the single cover for this song 
2. Then I used the bucket fill tool in photoshop and filled over the logo in white. I was originally going to make the logo a vector however it was too pixelated so I had to go with this option which didn't get the cleanest result but ideally I would've got the high resolution logo from the artist.  3. I then used the magic wand selection tool and erase tool to erase everything around the logo. Underneath the logo layer in photoshop was a solid blue colour matte. Once I had erased the pixels around the logo I used the screen blending mode to make the black inside of the logo appear transparent.


SHOT 9 - 25 mins


4. I then imported the file into my video editing software on top of the clip it will be overplayed on. Once the logo was central I applied the ultra key effect which allowed me to remove all of the blue, leaving just the logo. 
 3. I then used opacity keyframes on all layers except the bottom (base layer) to fade in the actor in the different positions he was in (mimicking raindrops.) To allow all of the different subjects to appear on screen together I used elliptical masks around each person with a big feather value (blend the skies,) to sort of 'cut them out.'
 4. Next I 'nested' all of the stacked clips so that I could edit them as one clip. Using the scale tool I then created a zoom in movement which started on the beat drop by key framing and animating the scale property.
  5. I then created an adjustment layer over the top of the nested sequence and did some basic colour grading. Decreasing the highlights and increasing the shadows to increase the contrast and in turn moodiness of the shot.
  6. To finish off the clip I then created an adjustment layer placed between this shot and the next. To this layer I applied a pre-made 'luma fade' transition which basically just blends the highlights of the two clips. I needed to use a striking transition like this because the shots were very very different.

SHOT 3 - 5 mins


5. Then I made the shot and logo 1-2 seconds longer as it worked better
6. Next I added a new adjustment layer above the two video tracks where I did some basic colour grading to make the shot look colder, greener, more miserable and less saturated. 


7. Harsh cut transition to next shot
SHOT 2 - 38 Mins
1. Firstly I stacked all of the clips of the actor in different positions in the frame on top of each other in the order that I wanted them to appear. 

2. I made the bottom layer a bit slower so that it would occupy the whole timeslot between shot 1 and shot 2. Speed to 93%. 


SHOT 3 - 5 mins
1. Initially I made a slight cut to the clip at the start so that the diegetic audio matched the beat of the song.
2. After that I then used the rotation and scale tools to make the clip look more level and therefore more professional.  3. Next I did some basic colour adjustment. Making the clip warmer, greener and a bit more contrasting so that it matched the colour (as best as possible,) to the previous shot. This adds more continuity to the video.
SHOT 4 - 10 mins
1. I slightly trimmed the start of the clip so that it matched the beat


SHOT 4 - 10 mins
1. I slightly trimmed the start of the clip so that it matched the beat

2. I then made small colour adjustments to make it match better with the previous clip and give it a more professional look however this was difficult due to the poor lighting conditions and varying white balance. 

3. As there was some background noise between the diegetic audio peaks I used alt + the cut tool to remove the audio track between the main peaks.

4. After this I added an adjustment layer between this shot and the next and applied a warp transition which I downloaded online to the layer. This made the transition smoother as the mis-en-scene was quite different. 

SHOT 5 (all jump cut shots in living room) - 3 mins


1. I was happy with the framing of the shots and the timing of the jump cuts created through the use of the cut tool. This meant that all I needed to do to these clips was add an adjustment layer which overlaid them so that I could alter the colours and exposure. Decreasing the highlights, increasing the shadows and making it colder WB. 
SHOTS 6 AND 7 - 0 mins

SHOTS 6 AND 7 - 0 mins
I was happy with how these shots looked and with the timing of the harsh cuts between them so I didn't alter them at all - did all that was needed in the offline edit.
SHOT 8 - 7 mins
1. Firstly I used the cut tool the cut the clip into two separate clips on the hit of the beat.  2. I then reversed speed on the second clip so that the movement would be backwards in the video.
  3. After that I created an adjustment layer which overlaid the normal and reversed clips so that I could alter the contrast and saturation to make it more 'moody' as well as scale the shot in so that the river bank was cut out.


1. I started by creating a black colour matte which would be overlaid to make the video black for a split second - matching the hit of the claps. I used the cut tools to match the black screen to the length between the two claps and some markers to indicate to me on the timeline where these claps were. The black label can be seen here labelled in brown. 

 2. I then highlighted and imported the actor in different positions and stacked the clips on top of each other in the order I wanted them (like in shot 2.)
 3. Following the method of shot 2 I used keyframes with the opacity effect control to fade in the different layers (leaving the bottom layer as a base.) The elliptical mask tool was used to cut out the actor in these different positions so that they could all appear in the same frame.


4. I then repeated the black colour matte clap effect from the start of the clip to transition this shot and shot 10 (next.) In addition to the black screen I also added a quick zoom out transition which I downloaded online to the end of the clip. 


SHOT 10 - 0 mins
I was happy with how this shot looked so I left it how it was
SHOT 11 - 3 mins
1. Originally I was going to use the crop tool to have the actor in frame twice (playing chess against himself.) However I decided to leave it as a jump-cut because it better represents solitude and isolation. Furthermore it could be confusing for the viewer if they don't recognise that it is the same person which would kill the meaning of the video.
2. This meant that the only editing I did to these chess clips was adding an adjustment layer over the top of them and doing some basic colour and exposure correction. Making it colder in the mid tones and increasing the highlights to make the shot look cleaner and a bit better exposed. 


SHOT 12 - 5 mins
1. There was not much that needed to be done to this shot in terms of movement or special effects despite some slight colour adjustment to make it look more professional and cohesive with the other clips. However instead of manually altering all the colours I used a colour preset which I downloaded from the internet. This preset obviously doesn't work on all clips but it saves time and looks good on some of them. It was a little bit too intense though so I reduced the intensity by 50%. 
 2. Similar to the transition between shot 2 and shot 3 I added a 'luma fade' transition between this shot and the next. I did this because there was quite a large contrast between the two scenes due to lighting and angles. A luma fade basically just merges the highlights of both clips into black.
SHOT 13 - 5 mins


SHOT 13 - 5 mins
1. I added the same colour preset to this clip as I did in the previous clip as it saves time, adds continuity and worked well on this clip.


2. I wanted a transition from this clip that was smooth but also enough to mask the change in angle and mis-en-scene from the high angle of lighting the joint to the low angle of smoking it. A quick zoom out transition which I downloaded online was applied to the end of the clip. 
SHOTS 14 AND 15 - 90 mins

1. Firstly I cut shot 14 in half on beat and made the second half 50% speed.


2. After this I colour graded the clip with the online colour preset.  3. Next I used the 'I' and 'O' keys to select just shot 14 and export it to a memory stick.
 4. Then I moved on to editing shot 15. Firstly I stabilised it using the warp stabiliser effect in Premiere Pro.
  5. After that I wanted to create the glow effect with this clip so I placed an adjustment layer over it so that I could add my effects to it. Next I added the gaussian blur effect to the adjustment layer and set the blur value to 37.0. After that I set the opacity blend mode to 'linear dodge (add)' which created the glowing lights effect. The glow was too bright so I set the opacity of the adjustment layer to 25%.
  6. Next I used 'I' and 'O' to export shot 15 onto the memory stick.
 7. This memory stick was then inserted into my old and extremely sluggish PC where I had the software necessary to create the effect I desired (datamosh studio.)


8. Once I had created a new project in 'datamosh studio' I had to import shot 14 and shot 15 into the software. After that I had to alter the 'i-frames' and render the footage which took lots of painful trial and error. 


9. Unfortunately, after all of that effort the transition did not look how I desired due to a lack of movement in the shots so I decided to use the usual luma fade transition that I had been using previously.  This is how the failed transition looks (you can see why it didn't work out):

SHOT 16 - 7 mins
1. I copied and pasted the adjustment layer from shot 15 over the top of this shot to create the dreamy glow effect.  2. The shot was a bit dark compared to the ones that surrounded it so I increased the exposure slightly.
  4. The shot didn't appear to be level so I used the rotation and scale effect controls to level it out and make it look more professional.
  5. Finally I added the fast zoom out transition which I downloaded off of the internet to the end of the shot.


SHOT 17 - 3 mins
1. I created an adjustment layer above the shot and applied a colour preset to make the shot bluer and more cohesive with the other shots. (+saves time) 2. The clip was a little bit too shaky so I added the warp stabiliser effect to smoothen the movement.


SHOT 18 - 3 mins
1. I started by using the rotation and scale controls to make the clip appear more level and therefore more professional.  2. Like the previous shot I applied a colour preset to speed up the process and add tonal continuity.


SHOT 19 - 30 mins
1. Firstly I colour corrected the clip using a preset I downloaded from the internet as this saved time and looked good. The shot was too bright so I reduced the exposure by 0.9.


2. After that I exported this shot from Premiere Pro (main editing software) and imported it into After Effects (special effects.) 
 3. Then inside of after effects I copy and pasted the shot around 50 times and stacked each duplicated clip on top of the last. Each duplicated clip was placed 1 frame in front of the previous clip which creates the lag/ long exposure effect.
  4. Once I had done this for the entire duration of the original shot I selected all of the clips besides the bottom clip and pressed 'T' which meant I could alter their properties as one clip.
  5. I set the opacity of all the clips to 5% as this meant that all of the clips were visible on frame with the kind of ghosted look.
6. Finally I exported the clip from After effects back into Premiere Pro where it replaced the unedited shot. (edited shot in tan colour.)

 2. After that I animated an elliptical opacity mask on the duplicate layer which allowed me to cut out the actor in a different position and have it appear on frame that there are two of him.
 3. Finally I created an adjustment layer which meant that I could simultaneously alter the colours of both these layers. On this adj layer I increased the contrast, decreased the shadows, decreased the highlights and made the WB colder.

SHOT 21 - 1 minute
SHOT 27 - 5 mins


6. Finally I exported the clip from After effects back into Premiere Pro where it replaced the unedited shot. (edited shot in tan colour.)

SHOT 20 - 10 mins
1. Firstly I duplicated the shot and placed the duplicate clip half a second behind the original.


1. I used the warp stabiliser effect to make the handheld movement in the shot smoother. 

SHOT 22 - 2 mins


SHOT 22 - 2 mins
1. I added a colour preset as it looked good on the clip and saved time whilst adding continuity. 
SHOT 23 - 3 mins
1. Just like the previous shot I added the same colour preset for the same reasons. 2. Next I created a black colour matte which would temporarily make the shot black to match the duration of the snares. This acted as a nice and simple transition.
SHOTS 24 AND 25 - 1 min
1. As both of these clips had very similar tonal qualities I created an adjustment layer which covered both of them, allowing me to apply a colour preset to both of them at one time.

SHOT 26 - 5 mins
1. Shot 26 is every shot of the card game scene from the same central angle. Instead of having the actor appear twice on frame I used the cut tool to create a jump cut as this better represented solitude and matched better with the beat of the song.

SHOT 23 - 3 mins
1. Just like the previous shot I added the same colour preset for the same reasons.


SHOTS 24 AND 25 - 1 min
1. As both of these clips had very similar tonal qualities I created an adjustment layer which covered both of them, allowing me to apply a colour preset to both of them at one time.


SHOT 26 - 5 mins
1. Shot 26 is every shot of the card game scene from the same central angle. Instead of having the actor appear twice on frame I used the cut tool to create a jump cut as this better represented solitude and matched better with the beat of the song.

2. As this shot had exactly the same lighting and mis-en-scene as shot 11 I copied and pasted the adjustment layer from that shot and added it above this one. This meant that the same colour grading was applied. 

1. I used the position tool to centralise the chess board in frame. Moved shot to the left -60.0 people.  2. I then created a new adjustment layer and increased the contrast of the clip to make it appear 'moodier'.
SHOT 28 - 5 mins


SHOT 28 - 5 mins
1. To make the clip level in an attempt to make it appear more professional I rotated it by +2°. 2. I applied a colour preset to the clip as it looked better, added continuity and saved time.
SHOTS 29, 30 AND 31 - 30 mins


1. I increased the speed accordingly for each clip so that it fit in the time slot that I marked out in relativity to the beat. For example I increased the speed of shot 30 to 5000%.  2. I then created an adjustment layer which overlaid all 3 shots so that I could colour grade all 3 shots at once using the same colour preset. This added continuity.
  3. The exposure in shot 30 was fine however shot 29 and 31 were too dark so I used the cut tool to divide the colour adjustment layer. I accordingly reduced the exposure of the layers which altered 29 and 31.
 4. After that I decided to create a blurred edge effect instead of 'tilt-shift' like I planned because I knew how to execute it better and it adds a similar feel. This effect is achieved by first creating a new adjustment layer over all 3 shots (labelled in lime green) and then adding the 'VR digital glitch' effect to it. 'Geometry distortion X' set to 0 (-50.) 'Distortion complexity' to 1 (-39.) Distortion rate to 0 (-50.)


 5. I then used an inverted elliptical mask with a large feather value (250) so that the glitch effect only affected the edges of the shot.
  6. To the same (green) adjustment layer I added a lens distortion effect with a -9 curvature to make the shots look more surreal.
  7. Above the green adjustment layer I created a new adjustment layer (this time labelled in orange.) This was because I needed a layer to add to which had not been altered by any other effects. To this new layer I added a 'fast blur' effect set to 16.0 to make the mis-en-scene seem more surreal and miniature. To ensure that the effect only affected the edge on the frame I used a feathered elliptical mask.

1. I didn't alter these clips at all from the offline edit, just using the cut tool to create harsh, timed transitions.


SHOT 32, 33 AND 34 - 0 mins
SHOT 35,36 AND 37 - 10 mins
1. The colours and exposures were all fine throughout these 3 shots so I left them how they were and instead increased the speed of each clip accordingly so it fit the beat. Shot 35 5000% speed, Shot 36 4000% speed, Shot 37 2000% speed. Time-lapse look. 


SHOT 38 - 20 mins
1. Firstly I exported the clip from my main editing software into After effects to make SFX easier.
2. Once in After Effects I duplicated the shot, each time one frame in-front of the other which creates the lag/ long exposure effect. 3. I then selected all of the duplicated clips besides the bottom (base) one and pressed 'T' which meant I could lower the opacity of all of them by 5%.
 4. The shot was then exported from After effects into my main editing software where it replaced the un-edited shot. (labelled in tan.)
SHOT 39 - 1 min


SHOT 38 - 20 mins
1. Firstly I exported the clip from my main editing software into After effects to make SFX easier.
2. Once in After Effects I duplicated the shot, each time one frame in-front of the other which creates the lag/ long exposure effect.


1. The only alteration I did to this clip was an 8000% increase in speed to create the time-lapse effect. 
SHOT 40 - 20 mins

SHOT 40 - 20 mins
1. I started by creating an adjustment layer above the shot which allowed me to do some basic colour correction as well as lower the whites and decrease the highlights to make the shot seem more miserable.

 2. I exported this shot from Premiere (main) into After effects (special effects based.)


3. In After effects I created a new composition from the shot and duplicated it, each time placing it 1 frame in-front of the previous one. Creating the lag effect. 4. I then selected all of the clips besides the bottom one and changed the opacity of them to 5% which created the long-exposure effect.
  5. Next I exported the clip from After effects into premiere where it replaced the un-edited version. (labelled in tan.)
SHOT 41- 2 mins
1. I actually quite liked the shakiness of the clip so I decided to leave it how it was (sped up.) Then I just did some basic colour grading. Decreasing the highlights and slightly increasing the temperature.

SHOT 42 - 10 mins


SHOT 41- 2 mins
1. I actually quite liked the shakiness of the clip so I decided to leave it how it was (sped up.) Then I just did some basic colour grading. Decreasing the highlights and slightly increasing the temperature.


1. Firstly I added a base layer (shot of the scene without Will in,) which meant that when Will faded out the screen did not fade to black. This base layer is labelled in green.  2. Then on the top layer (with Will in) I keyframed the opacity to reduce so that it appeared Will was fading away whilst the background stayed the same.

End graphic - Once the video cut to black I downloaded the artist's logo from the internet and inverted. I then imported it into Premiere and used the cut and drag tools to have it appear when I wanted it to.


End graphic - Once the video cut to black I downloaded the artist's logo from the internet and inverted. I then imported it into Premiere and used the cut and drag tools to have it appear when I wanted it to.
Here is the final edit of the music video I created for 'YEEK - Solstice':
Here is the final timeline for this edit: 

I also made a black and white version to compare:
Both the actor and myself prefer the black and white version as it feels more continuous both in tonal quality and mood. The colour version is still the main final edit is this is what I had planned.


No comments:
Post a Comment