Thursday, October 22, 2020
Camera movements and angles
When setting up a scene the director or DOP has to decide how to take the audience into the action. When deciding how to move the camera you have to first dictate the scene - considering the emotions of the characters and audience. I will be looking at 9 camera movements that the cinematographer and director collaboratively use.
The Pan means swiveling a video camera horizontally from a fixed position. It is similar to the motion of someone turning their head to look at something. Some directors use fast pans, sometimes known as whip pans to add a burst of energy and surprise whilst others use slow pans to allow the audience to take in a landscape.
The Tilt is where the camera stays in a fixed position but rotates up or down in a vertical plane. This mimics the motion of someone moving their head to look up or down when inspecting something or establishing a location. They often reveal something to us, suddenly re-directing our attention.
The Zoom involves changing the focal length of the lens to make the subject appear further or closer away, it can be used for comical effect or to add a sudden sense of urgency.
The Dolly is a smooth movement, often on a track, which moves the camera through a space. This creates a different type of visual experience than the zoom or pan. 'Vertigo' was the first film to combine the zoom and dolly movements, known as the Reverse dolly zoom or the Vertigo effect. This is used to show a character having an intense personal experience.
The Pedestal Shot moves the camera up or down, with the rotation of the camera remaining the same.
The Crane or Boom shot is an impressive movement which may also use pan and tilt. This uses an external rig such as a Jib, crane or boom pole to get unique angles (usually high) to create interesting and memorable shots.
The Steadicam or Gimbal shot can have the same effect as the dolly. However because the camera is stabilised on the camera operator the camera glides gracefully through a space.
The Handheld shot contrasts the Gimbal shot and is often shaky and disorientating. This can be used in times of suspense or disaster to show panic or add a more immersive feel for the viewer.
Lastly The Rack focus doesn't necessarily involve moving the camera and instead revolves around changing the focus of the lens from one subject to another. This is used to bring something to the viewers attention, maybe showing what a character has focused on.
Camera angles
The Eye-Level shot is pretty self-explanatory, having the camera placed at the subject's eye level. This mimics how we see people in real life, breaking down boundaries and allowing for a more personal connection between the viewer and the character.
Low-angle shots frame the subject below their eyeline. These angles are usually used to emphasise power dynamics between characters. Showing superiority. Low angle shots of one character are usually paired with high angle shots of another to show this dynamic.
In High angle shots the camera points down at the subject (above their eye level.) They are used to create a feeling of inferiority or minuity.
Some other camera angles involve shooting the subject from different levels such as: Hip Level, Knee Level, Ground level, Shoulder level. These different angles are used to outline a subjects superiority/inferiority, build relationships between character and audience, show action (like walking) and emphasise small details.
The Dutch angle or Dutch tilt is when the camera is slanted to one side. Having the horizontal lines tilted this way creates a sense of disorientation, increases the tension or an unstable mental state. It is a great way to amplify whatever emotion you are trying to bring to the scene. Overhead/Bird's eye view shots are shot from above a subject. They are usually shot rom 90 degrees above as anything lower could be considered a high angle shot. They don't have to be really high as long as they show show the subject from above. They are great for providing perspective on a scene. This perspective is usually seen as 'neutral'.
An Aerial shot whether it be shot from a drone, helicopter or plane is captured from very high up. This angle establishes a large expanse of scenery. These shots are more accessible due to the influx of drones however new rules and legislation combat this.
Composition and framing
Composition and farming refer to the way elements of a scene are arranged in a camera frame. It is important because it refers to the arrangement of visual elements to convey an intended message. I'm going to outline some ways to frame subjects and look at some compositional rules.
The Single shot is where one subject is captured in the frame. They can be set and framed in any way the director desires as long as only one subject is featured.
The Two shot is a camera shot where two characters are featured in the frame. They are very useful when allowing performances to play out in a single take.
The Three shot is a shot with 3 characters in frame. They are very important in adventure style films and any film with a group of subjects. This is because it's very time consuming to shoot 3 single shots to show every character, this is also disorientating and too fast paced.
You can have any amount of characters in a scene and name them following this pattern however as the numbers get larger they are usually referred to as Crowd shots. This framing type usually features wider shot sizes to show all the characters in one frame.
Over-the-shoulder shot (OTS) shows your subject from behind the shoulder of another character. As it emulates perspective it is common in conversation scenes. They are used to provide scene orientation and connect the characters emotionally.When using this framing it is important to obey the 180 degree rule.
Similarly the Over-the-Hip shot (OTH) also shows a subject from behind another. However the with the OTH the camera is placed with a character's hip in the foreground and the focus subject in "the plane of acceptable focus." This can often be used to suggest a power imbalance if subjects are at different elevations.
The Point of view shot (POV) shows the perspective of one of the characters or an inanimate object. Most POVs are from the perspective of a character however there is nothing stopping you from showing the perspective of anything else. POV shots show us exactly what the character sees which helps us understand what is generating the character's reaction.
An Insert shot has many functions and is a key shot in directing the audiences attention. When we see a character look at something, the subsequent insert shot would show us what they see. They are also used to show audiences small and minute details that would go un-noticed otherwise, supporting dramatic irony.
Head Room is the space between the top of a subject's head and the top of the frame. Too much head room gives a sinking feeling to your subject and too little head room will annoy the viewer and create a very unappealing shot.
Frame within a frame composition occurs when you use a visual element in the image to frame the primary subject. This has the same purpose and effect of the leading line composition type, helping to direct the viewers attention.
Friday, October 16, 2020
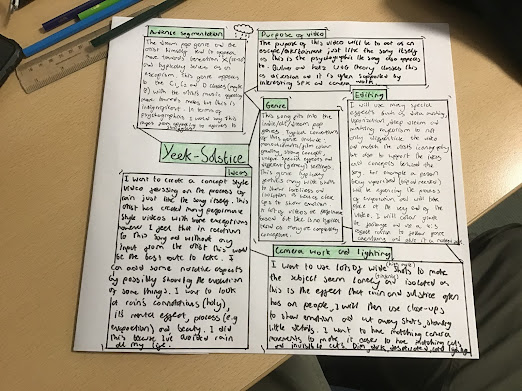
Exploration/brainstorming mind map
This is a mind map I created that explores the artist and song I have chosen. Looking at genre conventions, audience segmentation and my initial ideas. This will be more detailed and developed in my powerpoint music video proposal.
Tuesday, October 13, 2020
UNIT 3 Assignment Brief
This brief has basically given me free range to execute any ideas I had regarding a music video. The visuals must cover the entire length of the song and be relevant to the song's target audience. I've chosen to work individually and know that I want my video to lean more towards the concept style.
Monday, October 12, 2020
Applying some shot types
In groups of three we shot and edited this small video in around an hour to show different shot sizes and angles.
Wednesday, October 7, 2020
The 180° rule
The 180-degree rule is a cinematography guideline that states that two characters in a scene should maintain the same left/right relationship to one another. When the camera passes over the invisible axis connecting the two subjects, it is called crossing the line and the shot becomes what is called a reverse angle. Reversing the angle is commonly thought to be disorienting and can distract the audience from the intent of the scene.
We spent 10 minutes in lesson with a Sony mirrorless DSLR on a cloudy day, therefore using the corresponding whit balance preset trying to show the 180 degree rule.
Tuesday, October 6, 2020
Camera shots: Shot sizes
The Master shot (MS) often follows the EWS and confirms the location and geography of a scene. It also shows the characters in the scene and where they are in relation to eachother.
The Full shot (FS) is when the subject's entire body reaches from the top to bottom of the frame. This is used because it is tight enough to show facial expressions but also action.
The Medium full shot (MFS) shows the top of a subjects head down to their waist. This can be used to present a character as confrontational or dangerous which is why it is often referred to as the 'Cowboy shot' (holster height.) The Medium shot (MS) is seen as the most popular shot size in film making and is often described as neutral as it doesn't feel very dramatic. It is used because the subject is at a similair distance to how we would be when interacting with someone in real life. It is typically shot above the waist but below the chest.
The Medium close-up shot (MCU) shows from the characters mid chest to just above their head, this is intimate without losing the subjects physicality. It's good for showing close conversations between characters as it is a bit more intense than the regular MS.
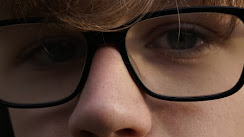
The Close-up (CU) highlights thoughts, feelings and a change in emotion. This is typically shot at eye-level to add intimacy and outlining the 'windows' into a character's psyche. They are also used at times of decision or anxiety.
Finally the Extreme close-up (ECU) isolates a specific area on a subject, this could be the lips, eyes etc. This is very intimate and dramatic as well as showing the viewer smaller details which they could've missed if other shot sizes were used.
-
Today I'll be researching into the 2014 film 'Pride' by Calamity Films using IMDB. This film, directed by Stephen Beresford, is ...
-
Camera work, transitions and editing techniques have been outlined in detail in my P1 Proposal . Specific camera directions can be seen in...
-
Shot choices are used to help establish the rhythm, tone and meaning of a scene. Knowing which shot sizes to use and when is one of the dire...


